This Chimney Has to Go: Part 1
It’s hard to believe we’ve already been in this house for nearly a year! Next week will mark exactly 1 year since we closed on this crazy old house of ours here in Richmond. While we definitely wish we were further along in the renovation, we know that it is a process and every bit of dust and bang of the hammer is an incremental step towards our dream home.
In today’s post we’re going to take you through our latest project, the removal of a defunct and crumbling old chimney. I know what you all are thinking - this does not sound like the most fun or glamorous blog post. Where’s the pretty stuff? Well trust me we have that in the works too but as with any renovation, you have to start with the ugly to get to the pretty.
On the surface this may seem like just another demolition recap but there are few key takeaways we want to share in how we ended up even taking on this project. While 30% of our decision to remove the chimney was based on the fact that this chimney was no longer serving any purpose other than to bring rain water directly into our house, the other 70% is what gave us the real motivation. Hint - it’s all about planning and unlocking room layouts that actually work.
99 Problems & This Chimney Is 1 Of Them
So let’s dive in. As mentioned, this chimney had some serious problems. Our house was built in 1910 and this chimney had seen very little love over its 100 year-old life. Beyond acting as the ventilation chase for our shady basement’s secret past, it served as the flue for the boiler. Since we are not running a 2nd business from our basement and we took out the boiler when we put in our ductless mini-splits last summer, this chimney no longer had a life’s purpose. At this point the only thing this chimney was doing was letting rainwater damage our guest bedroom ceiling and walls.
Beyond the moisture issues, the mortar had completely deteriorated above the roofline.. Given the age of the house, the mortar is made with lime rather than portland cement, and so it is more susceptible to weather exposure - particularly freeze-thaw cycles if it gets wet.. Even if we wanted to leave the chimney intact, serious remediation would have been needed to to repair and repoint the chimney at the roof.


A New Top Priority
Now that we’ve explained all the ways in which this chimney is defunct, let’s switch gears and focus on the real reason we decided to take it out. One of our favorite parts of a renovation is unlocking new ways to plan the house. We love rethinking ways a space lays out and can be best utilized. In our last house, we made sweeping changes to the plan and expanded to the attic. Given the more historic nature of this house, we’re making slightly less grand but still equally important moves. The removal of this chimney is just one of those many mini moves.
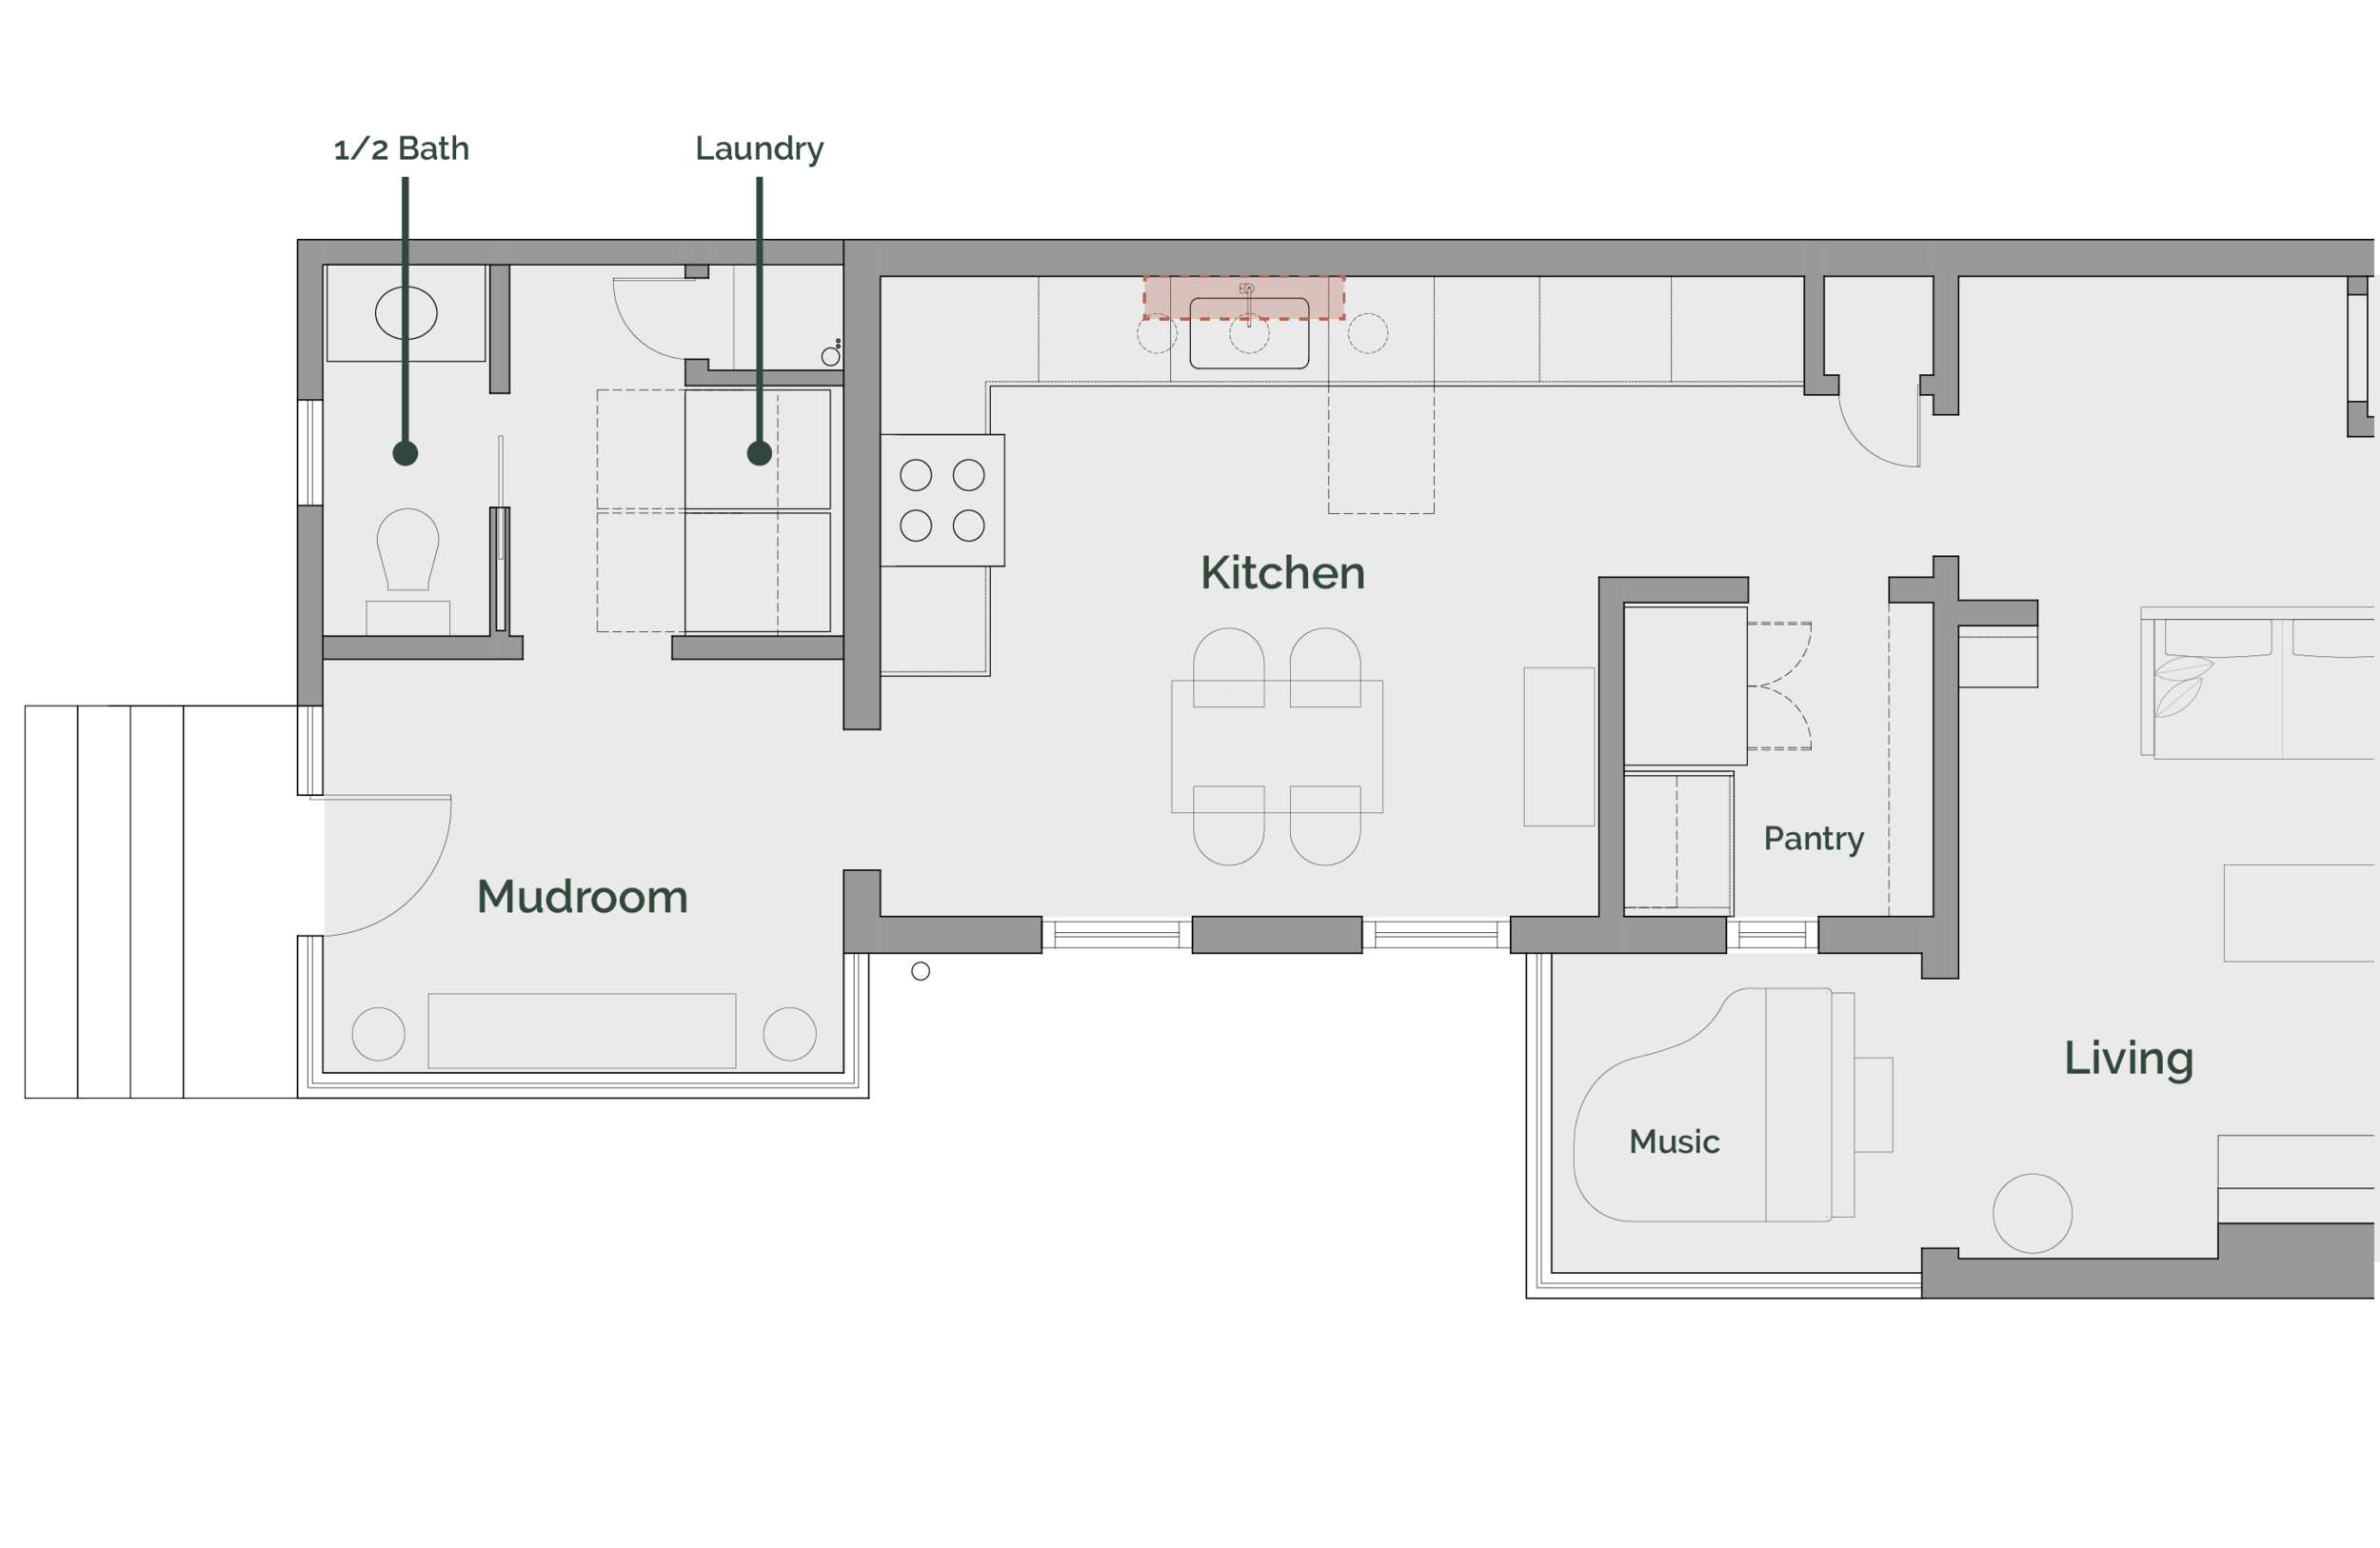
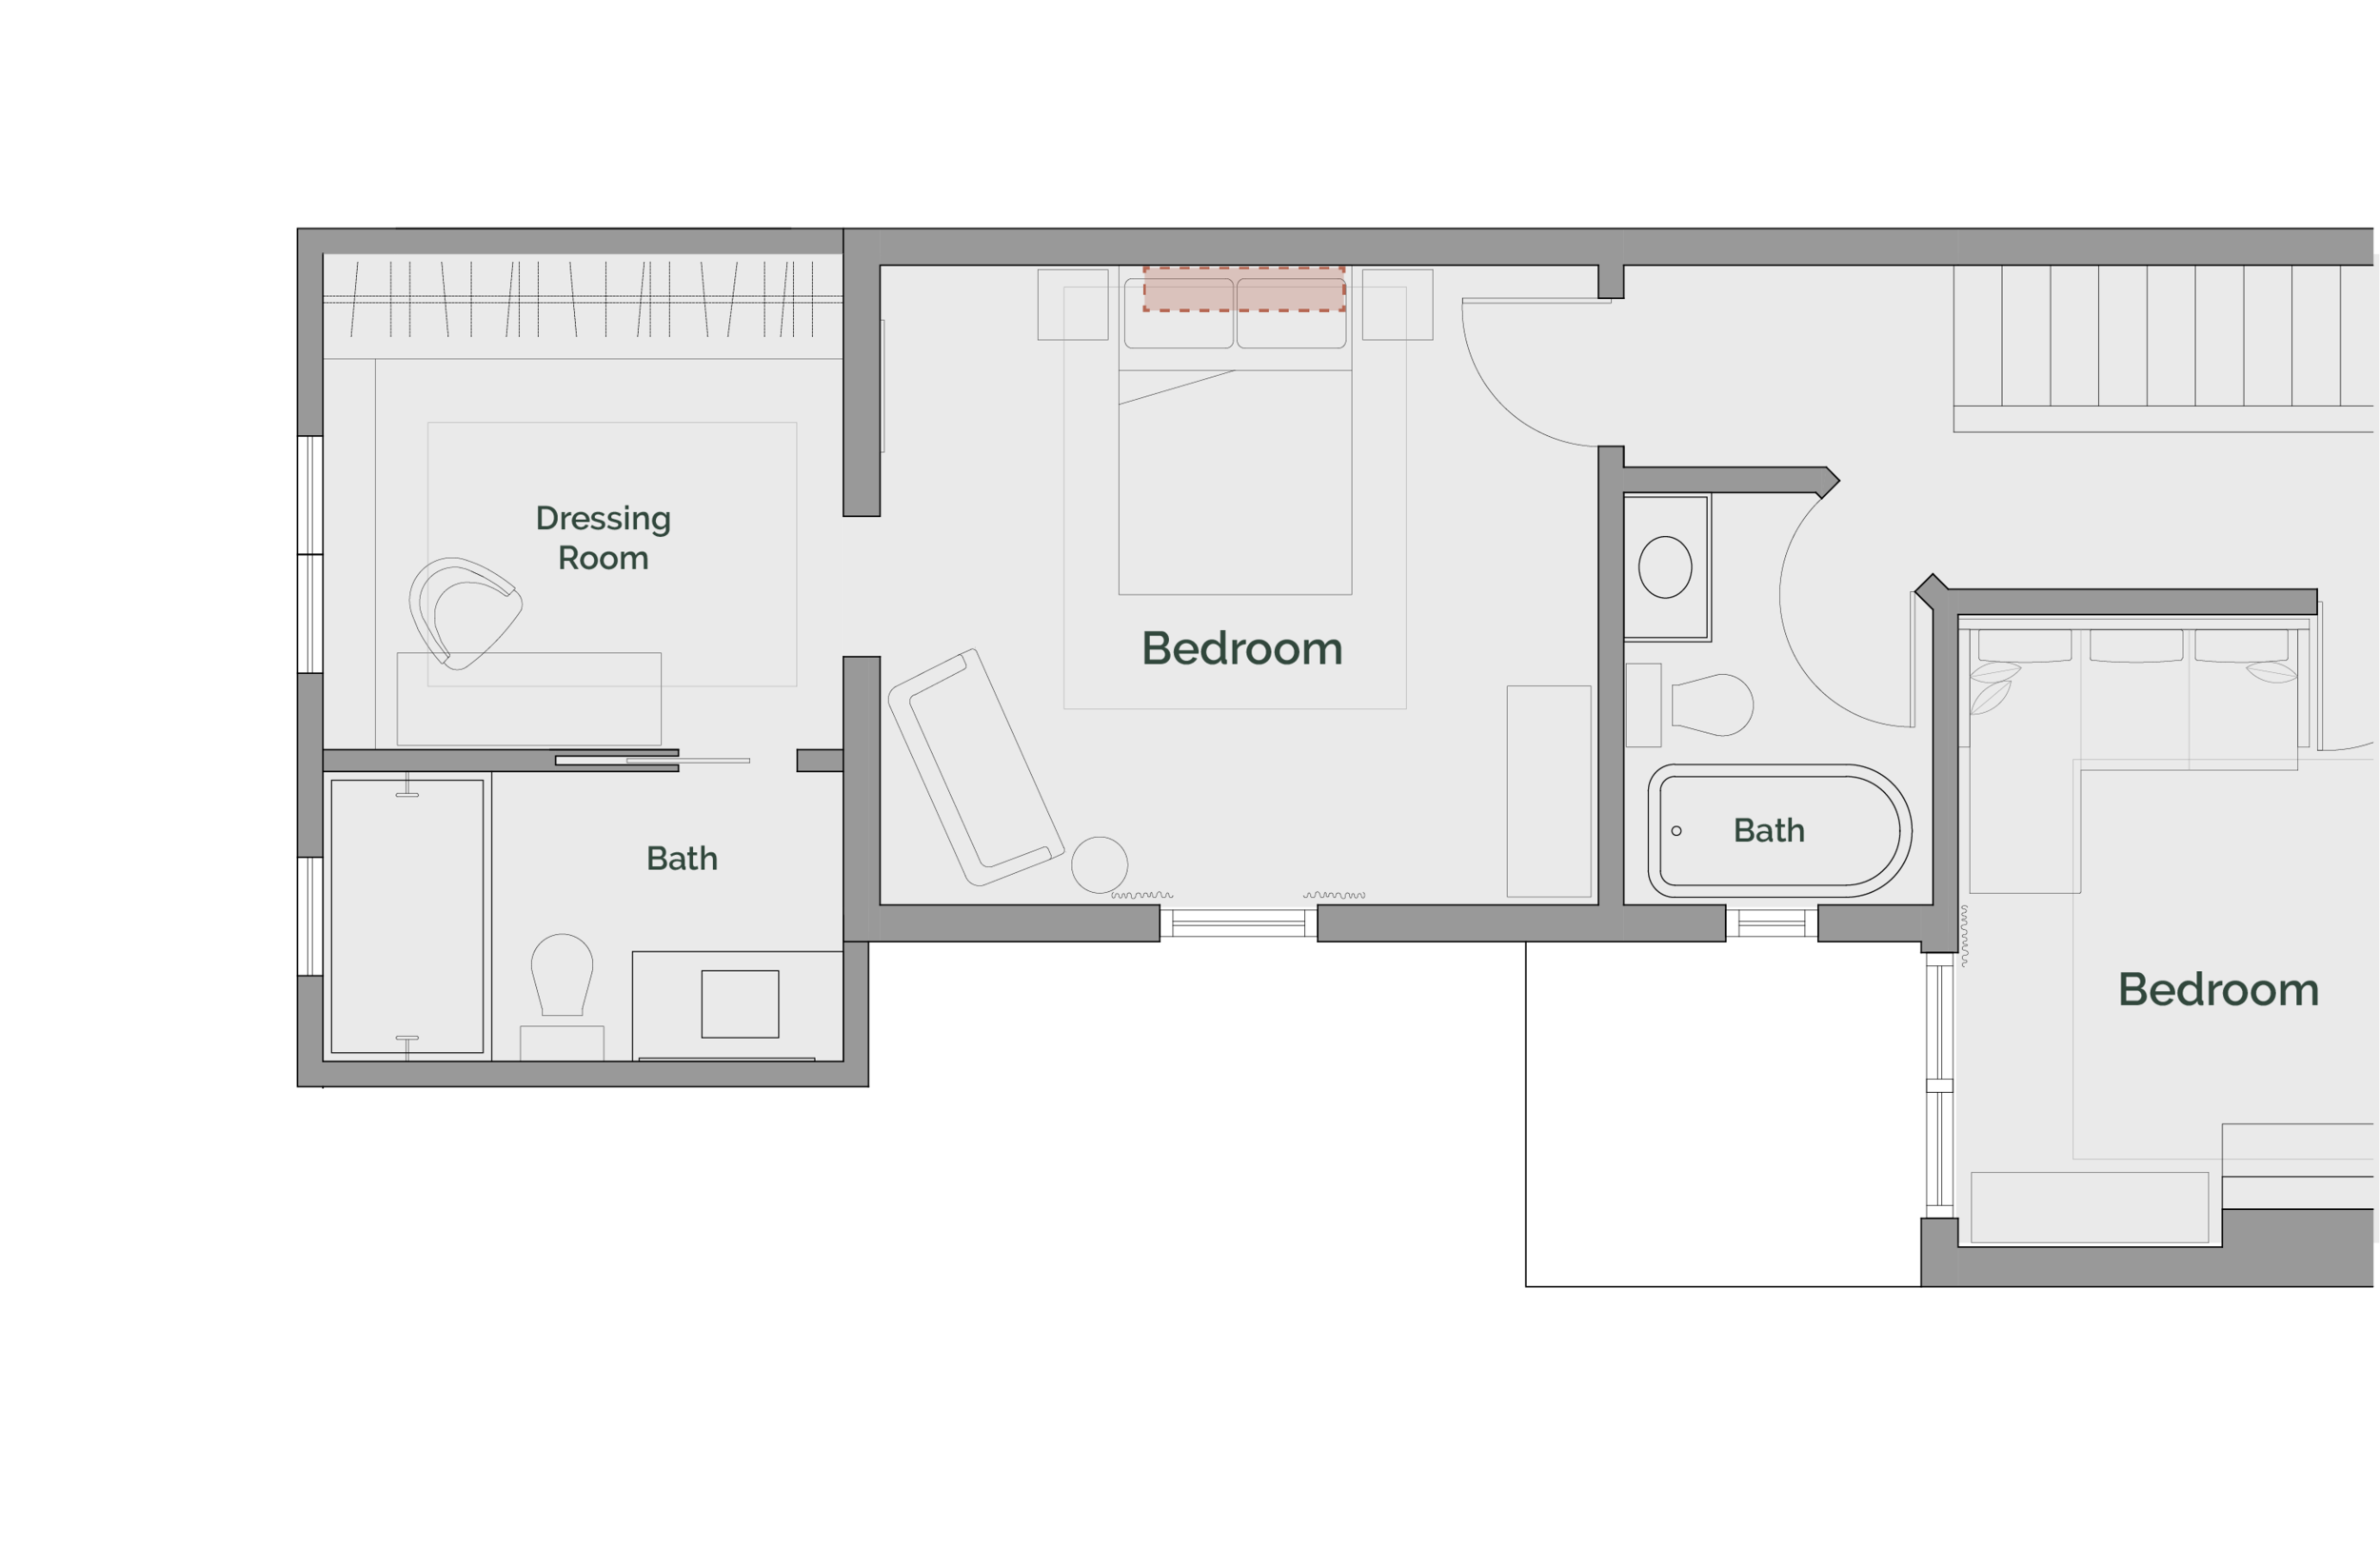
To get you oriented, we have a total of 3 chimneys in this house. The best and most photogenic of the 3 sits proudly at the front of our house in the dining room on the 1st floor and our bedroom on the 2nd. The next chimney is one room over from that and serves the living room and the upstairs study. It definitely needs some work but we’ll save that for some year in the future. The 3rd and most useless chimney sits at the back of the house, taking up space in the kitchen and 2nd floor guest bedroom. This is the only chimney without any fireplaces.
“We first discovered that perhaps this chimney had to go when we started planning our kitchen. We tried to plan the kitchen 15 different ways before deciding what would really unlock this plan is to have that thing gone. ”
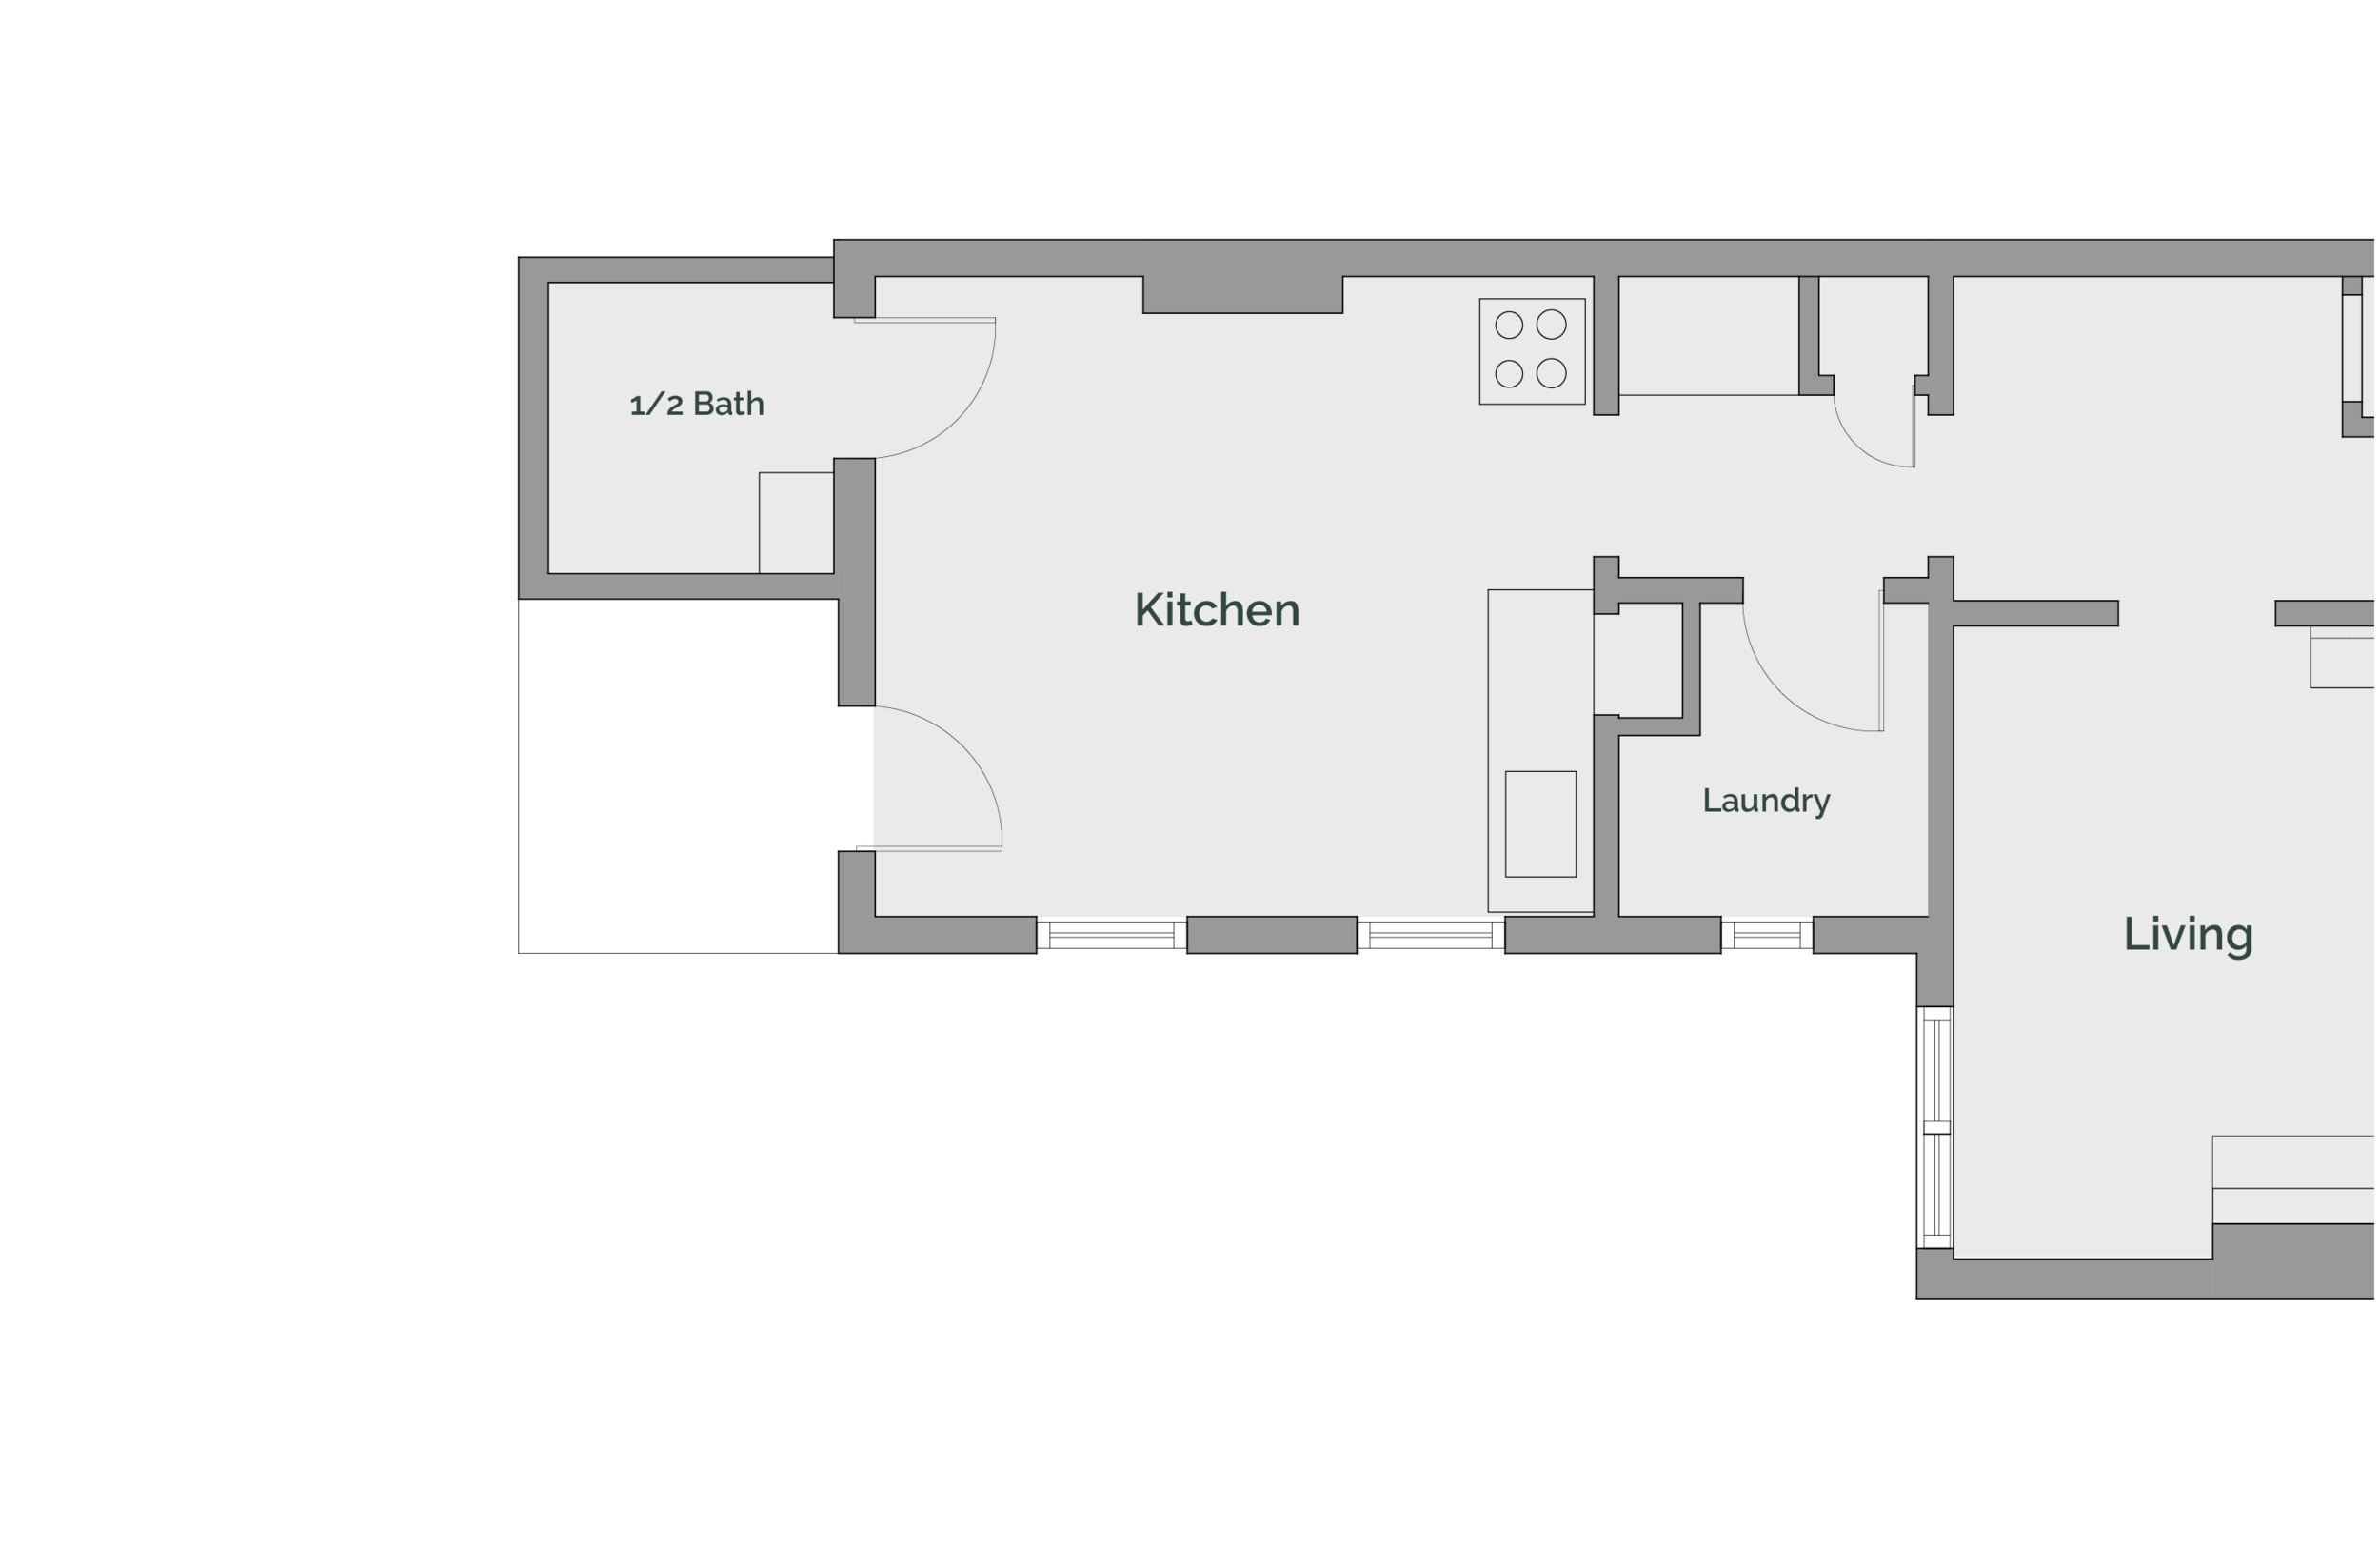
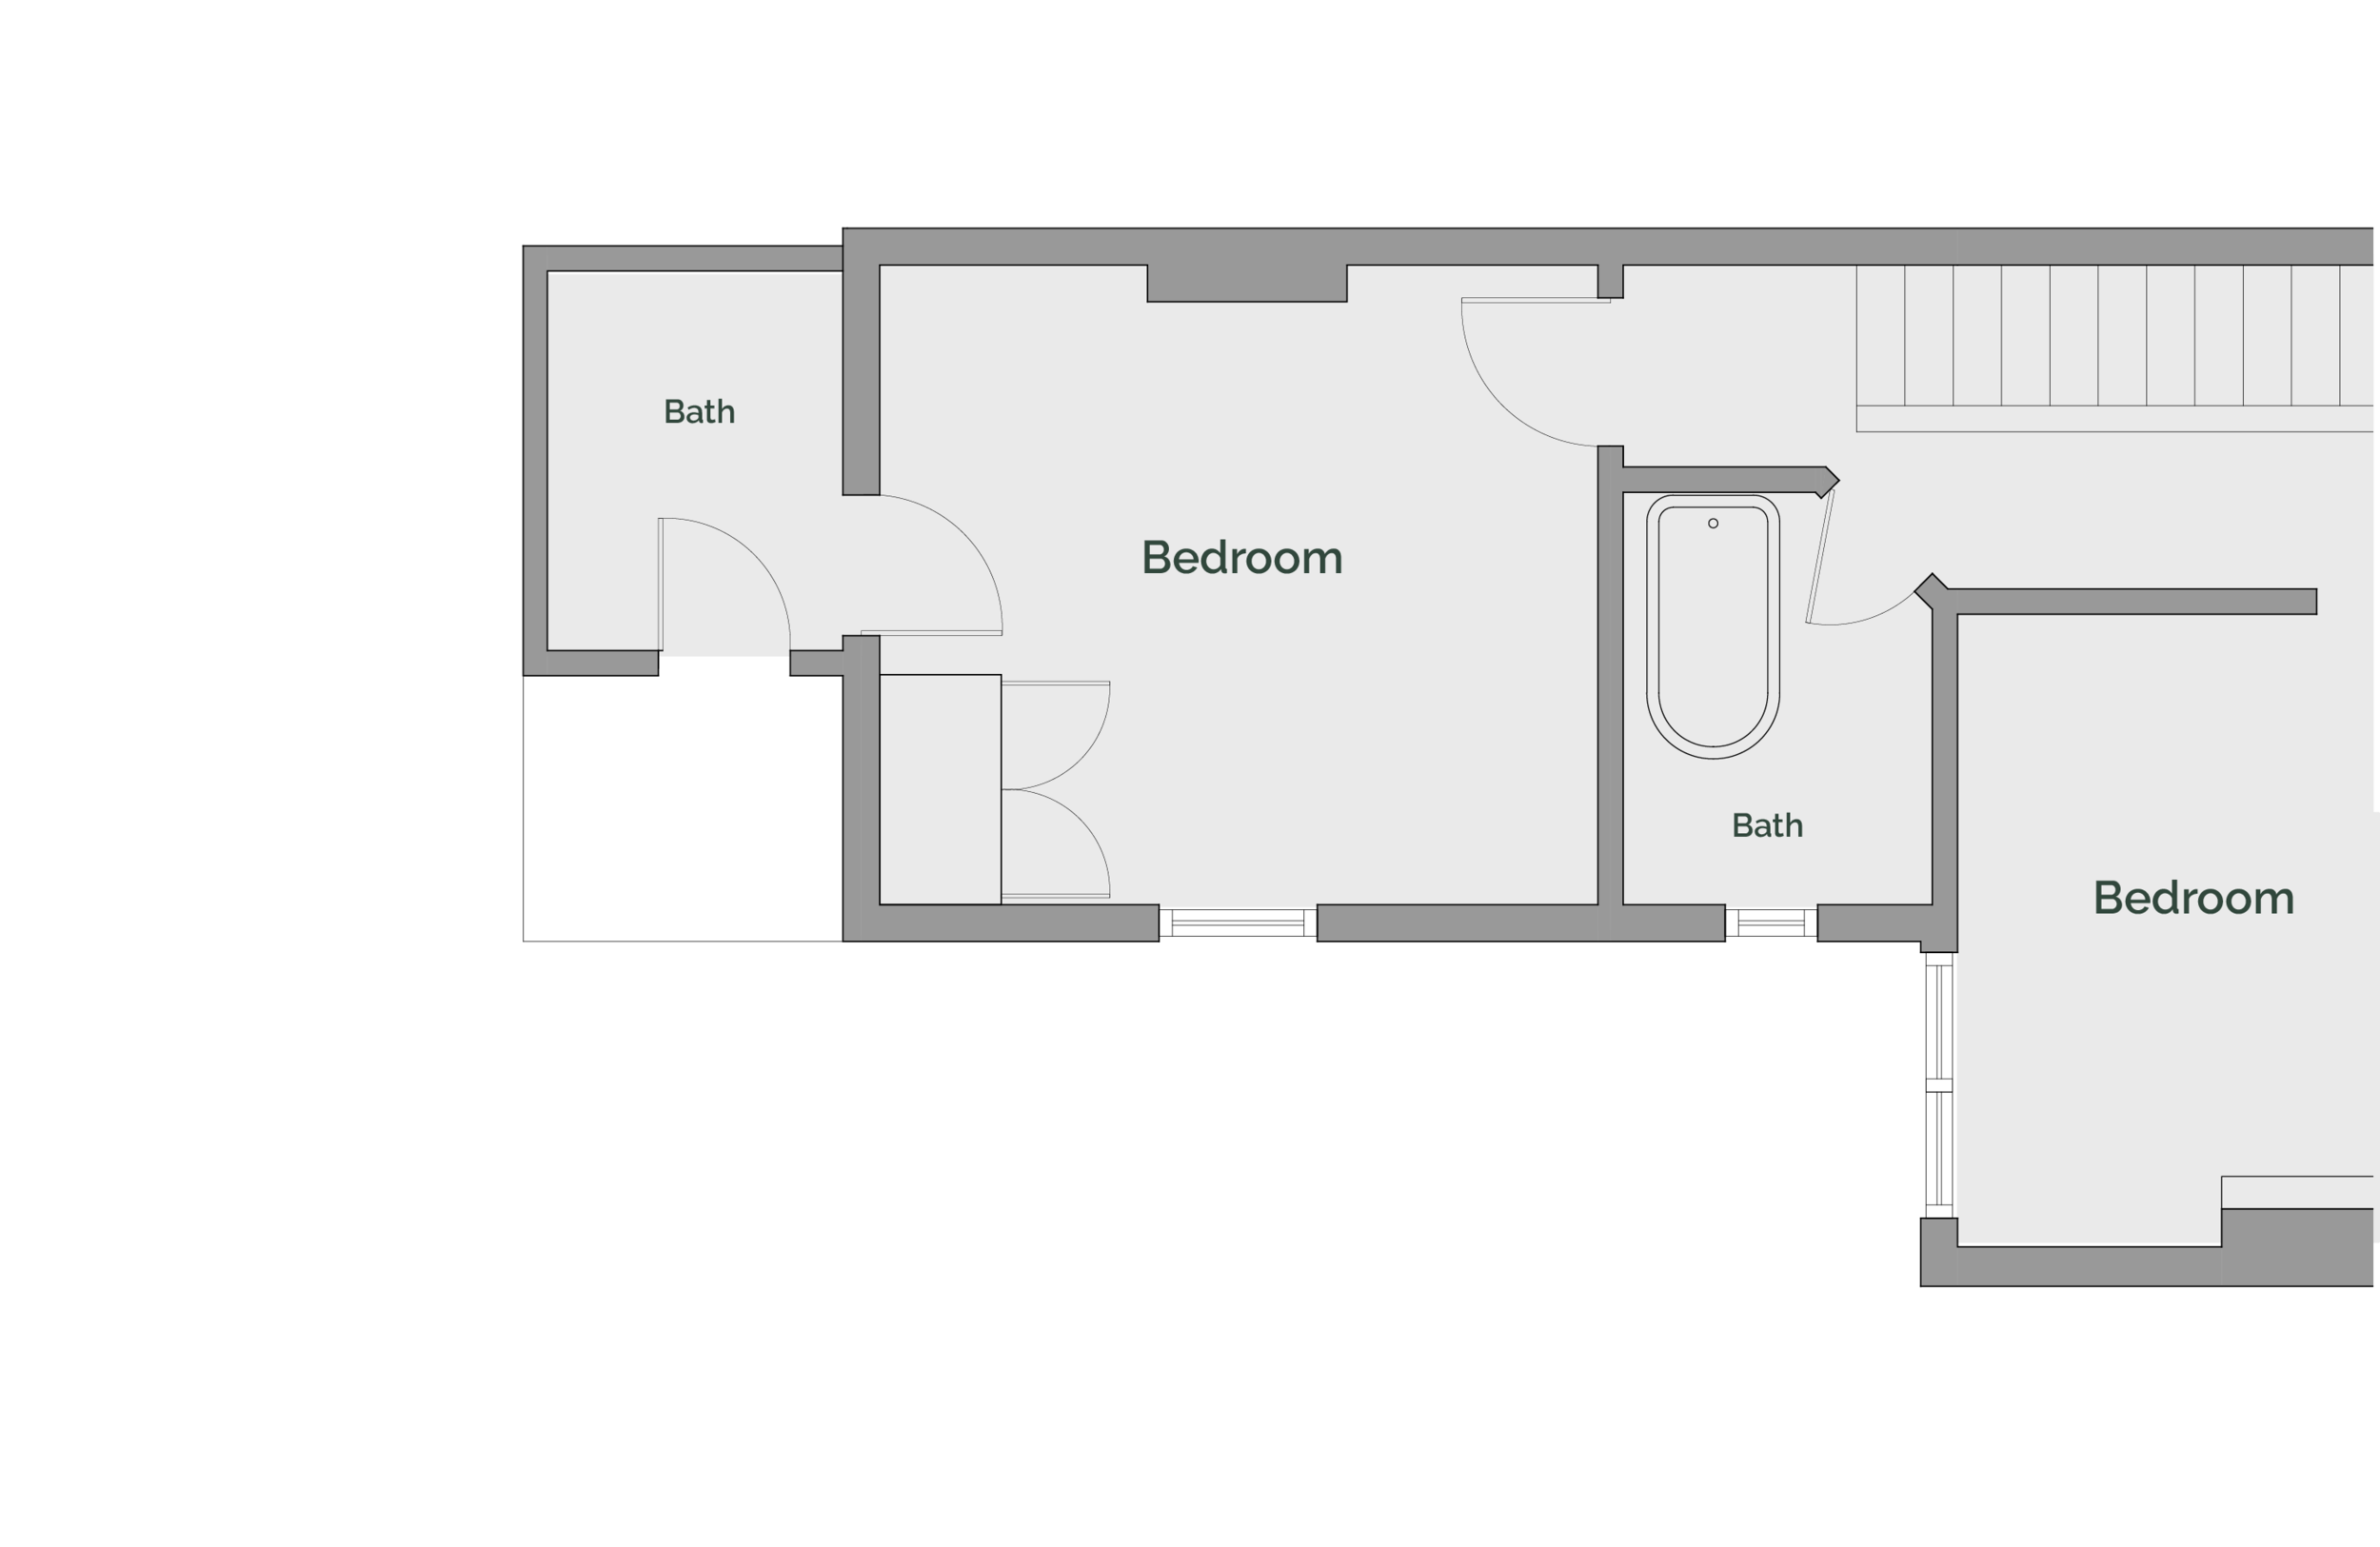
When we made that decision, it obviously meant that it had to come out at the upstairs bedroom as well since there would be nothing below to support it. Compound that with the fact that in just a couple weeks we are GETTING A NEW ROOF!!! (sorry for that intense level of excitement…I just don’t think you understand how long we’ve been wanting this), and we knew that the removal of the chimney had to bump up in priority level. It became the new #1 project in the house and we are excited to share the progress with you. The plan diagrams below show you a comparison of our future renovation plan with the existing house plan. The little red box represents the chimney we are demolishing. As you can see, keeping it in the kitchen would completely interrupt the counter and space plan. At the 2nd floor, the furniture layout possibilities (and optimal bed location) gets so much better once this chimney is gone.
1st Floor Plan: Before & (Future) After
2nd Floor Plan: Before & (Future) After
Let’s Get Ready To Crumble
To get started, Owen climbed up on the roof to check things out. We thought it would be this big daunting task that would take lots of chipping and banging away to knock the bricks loose. That could not have been further from the truth. Like we said, the mortar had serious deterioration issues and lucky for us, Owen barely had to lift a finger to get that thing to tumble down. He literally lifted each brick off the chimney as if they were delicately placed in some sort of longer term balancing act.
“The ease at which this thing came apart only reconfirmed our decision to take it down. ”
To be honest, the lack of structural integrity and water-proofing was quite astonishing. We are just glad that it came down safely and with no major mishaps. I think perhaps the most fun part of this chimney removal was seeing that big rusty red cap come down. It was also pretty exciting figuring out how to remove all the rubble from the roof. We’ll be sure to share that process in a future post! We’re going to go ahead and wrap up Part 1 of this series, but look forward to showing you the rest of the progress on this mini-project.


Be On The Lookout For Part 2
We hope this post helped all those DIY-ers and renovators out there think about how a small plan move can unlock a lot of potential in how you layout a space. While this wasn’t the 1st thing we decided to do in the renovation, there was a convergence of plan and schedule issues that led to it becoming top priority and a critical path item. We’d also like to remind everyone that because of the age of our house, the chimney removal was likely much easier than if it were a house built after 1930. New(er) houses use portland cement mortar and that would have been a whole different ball game in terms of removal.
We’d love to hear about all the little ways you’ve implemented small plan changes in your renovation that unlocked a whole host of layout potential. Drop us a comment below and be sure to share this post with any fellow renovation-lovers that might be interested in taking down a chimney of their own! And don’t forget to be on the lookout for Part 2 of this series where we walk you through the step-by-step process of taking down the chimney inside the room and infilling back the structure!


